How to Verify Packing Accuracy: The Complete Ops Guide
Your pick accuracy is 99.5%. You track it, report it, and feel good about it. But here’s the number nobody wants to talk about: packing accuracy. The step where the right items get placed in the wrong box, where quantity gets miscounted, where the blue variant ships instead of the green. Picking errors get the attention. Packing errors get the chargebacks.
This guide covers four methods for verifying packing accuracy, how to measure it, and where each method fits your operation.
Why packing accuracy matters more than picking accuracy
Picking accuracy measures whether the right item was pulled from the shelf. Packing accuracy measures whether the right item made it into the right box, in the right quantity, with the right packaging. Different things. The gap between them is where money disappears.
Picture this: a picker pulls the correct SKU and places it in the correct tote. At the pack station, the packer grabs from the wrong tote, miscounts a multi-unit order, or places items in a box already staged for a different order. The pick was perfect. The pack was wrong.
The WERC DC Measures benchmark reports median order-picking accuracy at 98.9%. Most facilities don’t separately track packing accuracy because their systems can’t tell pick errors from pack errors. Everything gets lumped into “order accuracy.” You could be solving the wrong problem. If your picking process is solid but your packing process is leaking errors, improving pick accuracy won’t move the needle.
Packing is the last controllable step before an order leaves your building. Once the box is sealed and labeled, the error is locked in. Returns, reshipping, customer service calls, brand damage, all of it traces back to the pack station.
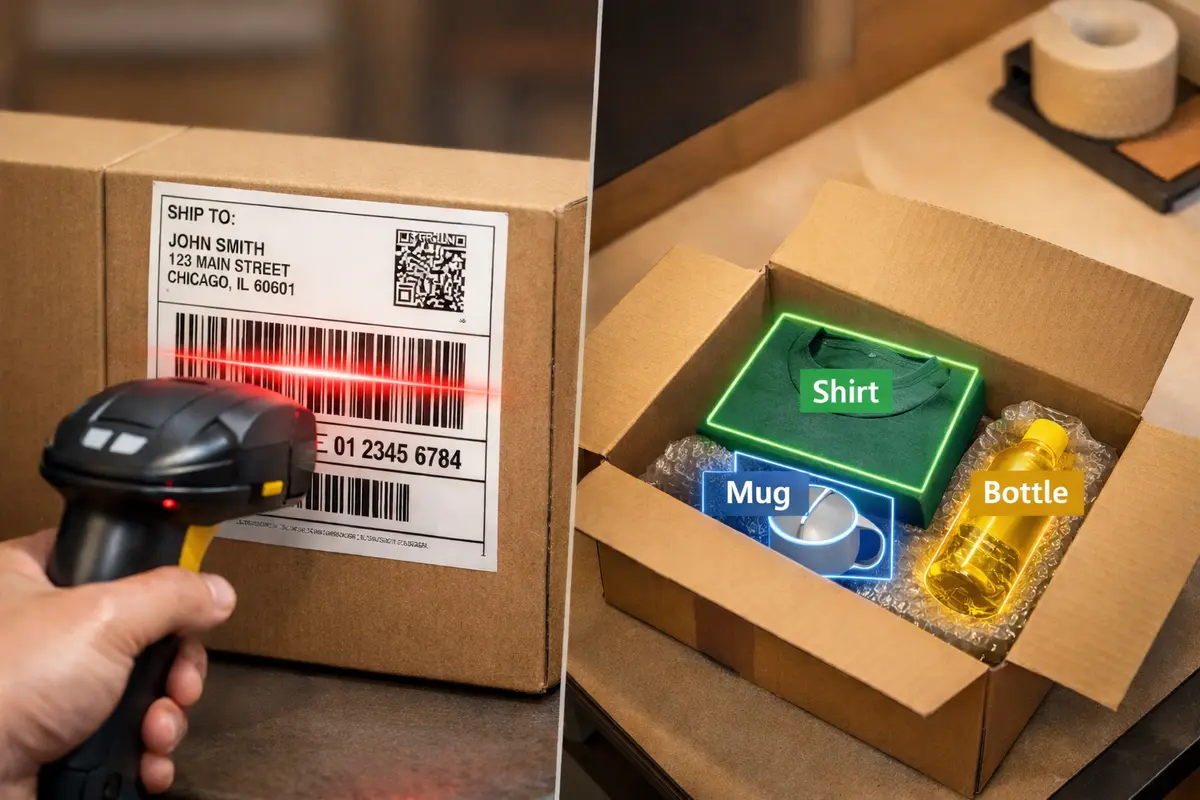
Method 1: Barcode scan-verify
How it works: Each item is scanned at the pack station before going into the box. The system compares scanned barcodes against the order manifest and confirms or rejects.
What it catches: Wrong SKU, missing items, extra items. The most common and most easily prevented errors.
What it misses: Visual defects, packaging compliance (inserts, tissue, branded materials), quantity errors when items are scanned but not physically placed, and variant confusion when similar products share similar packaging.
Implementation cost: Low to moderate. Most WMS platforms have native scan-verify or support third-party integrations. You need a barcode scanner at each station and maybe a display showing the order manifest.
Throughput impact: Moderate. Each scan adds 2-4 seconds per item. On a 5-item order, that’s 10-20 extra seconds. At high volumes, it adds up. Some packers learn to batch-scan or shortcut the process, which undermines accuracy.
Best for: Operations that need baseline SKU-level verification without large capital investment. Works well for single-item orders and operations where visual compliance isn’t a factor.
Accuracy improvement: Well-implemented scan-verify catches 85-95% of SKU-level errors. The rest come from process workarounds, double-scans, and errors that barcodes simply can’t detect.
Method 2: Manual QA sampling
How it works: A QA team member pulls a random sample of completed orders and reopens them for inspection before they ship. Sample size comes from an AQL (Acceptable Quality Level) table or a fixed percentage.
What it catches: Everything, in theory. A human inspector can check SKUs, quantities, visual quality, packaging compliance, label accuracy, and presentation.
What it misses: Every order that isn’t sampled. At a 5% sampling rate on 5,000 daily orders, you’re checking 250 and trusting the other 4,750.
Implementation cost: Low for equipment, high for labor. You need dedicated QA headcount. At $18-22/hour fully loaded, a single QA person checking 30-40 orders per hour costs $4-6 per inspected order.
Throughput impact: High. Sampled orders are delayed. Orders must be reopened and resealed, which creates a bottleneck that limits outbound capacity.
Best for: High-value orders, regulated products, or client contracts that require physical inspection. Often paired with scan-verify as a secondary check.
Accuracy improvement: Sampling doesn’t improve accuracy on uninspected orders. It gives you a measurement and creates accountability, but it doesn’t prevent errors on the 95% of orders that aren’t checked.
Method 3: CCTV review
How it works: Cameras mounted over pack stations record the packing process. When a complaint or dispute comes in, someone reviews the footage to determine what happened.
What it catches: After the fact, it can reveal what was packed, how it was packed, and who packed it. Useful for dispute resolution and root cause analysis.
What it misses: Everything in real time. CCTV is forensic, not preventive. By the time you review the footage, the wrong order has already shipped.
Implementation cost: Moderate for camera hardware, NVR storage, and network infrastructure. The bigger cost is labor. Most facilities spend 45-60 minutes per investigation scrubbing through continuous footage to find the right segment.
Throughput impact: None on packing itself. But investigation time pulls ops staff away from other work.
Best for: Operations that need an evidence trail for disputes but don’t need real-time prevention. Common in 3PLs where client trust requires visual proof of pack quality.
Accuracy improvement: Minimal for prevention. Packers who know they’re on camera may be more careful, but the real value is post-incident investigation, not stopping errors before they ship.
Method 4: AI vision verification
How it works: Cameras at the pack station capture the packing process in real time. Computer vision models identify items, count quantities, verify variants, and check packaging compliance. The packer gets instant feedback, no scanning required.
What it catches: SKU errors, quantity errors, variant mismatches, missing inserts, damaged products, label placement issues, and SOP compliance violations. The system sees what a human QA inspector would see, but at pack-line speed.
What it misses: Items fully concealed inside opaque packaging with no distinguishing exterior markings. Internal product defects that aren’t visible externally.
Implementation cost: Moderate to high upfront. You’ll need cameras (USB or IP), edge computing hardware, and software licensing. Total station cost varies by vendor and configuration.
Throughput impact: Low to none. The best implementations are passive. The packer doesn’t change their workflow, no scanning step, no pause, no holding items up to a camera. Verification happens in the background at line speed.
Best for: High-volume operations where error costs add up fast. Also a strong fit for 3PLs with brand-specific SOP requirements, or any facility where scan-verify alone isn’t catching enough errors. Especially useful when packaging compliance (branded materials, inserts, presentation) matters to your clients.
Accuracy improvement: AI vision catches errors that other methods miss because it verifies visually, not just by barcode. Staci Americas deployed it across 19 stations handling 25,000 orders/day and cut QA costs by 60%.
How to measure packing accuracy
If you’re not measuring packing accuracy separately from pick accuracy, you’re flying blind. Here’s how to calculate it and where your numbers should land.
The formula
Packing Accuracy Rate = (Orders Packed Correctly / Total Orders Packed) × 100
“Packed correctly” means every item is the right SKU, right quantity, right variant, in the right packaging, with the right inserts, sealed and labeled correctly. Define your criteria before you start measuring, or you’ll get inconsistent results.
What counts as an error
Define your error taxonomy clearly. Common categories:
- Wrong SKU: Different product than ordered
- Wrong quantity: Too many or too few units
- Wrong variant: Right product, wrong size/color/configuration
- Missing insert: Promotional material, thank-you card, brand packaging not included
- Packaging error: Wrong box size, insufficient void fill, damaged packaging
- Label error: Wrong shipping label, wrong return label, missing packing slip
WERC benchmark
The WERC DC Measures benchmark for median order-picking accuracy is 98.9%, translating to a 1.1% error rate. Most facilities don’t distinguish between pick errors and pack errors in their reporting, so this is often the combined rate.
Top-quartile performers hit 99.5%+. If you’re below 98.9%, you’re in the bottom half of the industry.
Cost per error
Your accuracy rate is a number. What each error costs you is what makes it actionable.
Average costs per packing error:
- D2C operations: $41 per error (shipping $8, labor $13, financial impact $15, product loss $5)
- 3PL operations: $56 per error (add SLA penalties and client relationship risk)
- Perishable goods: $74 per error (add spoilage and disposal costs)
The math at scale
| Daily orders | Error rate | Errors/day | Cost/error (D2C) | Daily loss | Annual loss |
|---|---|---|---|---|---|
| 1,000 | 1.1% | 11 | $41 | $451 | $164,615 |
| 5,000 | 1.1% | 55 | $41 | $2,255 | $823,075 |
| 10,000 | 1.1% | 110 | $41 | $4,510 | $1,646,150 |
| 25,000 | 1.1% | 275 | $41 | $11,275 | $4,115,375 |
At 25,000 orders per day with the industry-median error rate, you’re looking at over $4 million in annual losses from packing errors alone.
How to track it
- Define your error categories before you start. Be specific.
- Capture errors at the point of packing if possible (AI vision, scan-verify), not just at the point of customer complaint.
- Track by station, operator, shift, and client (for 3PLs). Aggregate numbers hide the real patterns.
- Compare internal catch rate vs. external complaint rate. If customers are reporting errors you didn’t catch internally, your verification process has gaps.
- Review weekly, act monthly. Weekly reviews catch trends. Monthly action items drive improvement.
The right verification method depends on your volume, your error profile, and what each error costs you. Most operations that move beyond scan-verify see a measurable drop in error rates within the first 30 days. Measure where you are now, pick the method that matches your biggest gap, and track what changes.